SpringCore is the umbrella name to the new generation of SpringCard devices (Puck, SpringPark, etc.) that share the same MCU platform and the same overall architecture. springcoreconfig.exe, a software from the SpringCore Tools suite, is the command-line utility to manipulate device configurations. It is typically intended to upload a complete configuration at once, but is also able to edit registers one by one.
This article shows how springcoreconfig.exe works.
To download and setup springcoreconfig.exe and the related tools, please read Installing the SpringCore Tools.
For more details on using the software, please refer to its online manual that is available at docs.springcard.com/books/Tools/SpringCore/SpringCoreConfig
NB: all screenshots in the article have been taken on a Windows system, but the software also runs on macOS and Linux (over the Mono runtime).
List the devices and select the target
If you have a single SpringCore device connected to your computer at a time, you may skip this paragraph.
springcoreconfig.exe operates on one SpringCore device at once. Therefore, if two or more devices are connected simultaneously to the computer, the command-line must specify which one is the target device.
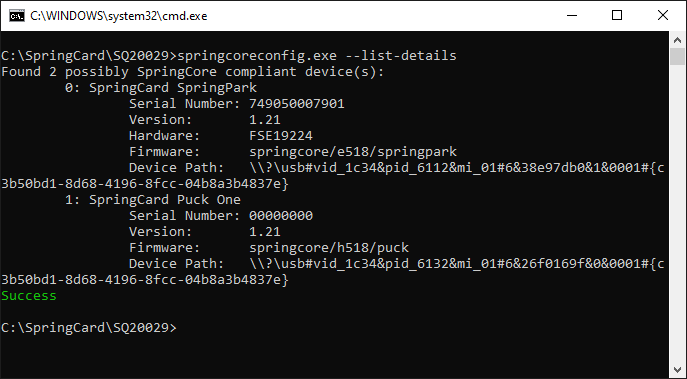
Enumerate the available devices
Use springcoreconfig.exe –list to list the devices.

Identify the device you want to work with, and remember its number.
Tip: if you have many devices of the same type (say, two Puck One), use springcoreconfig.exe –list-details to complete the list with the serial number, and use the device’s label to find the right one.
Select the target device
Knowing the device’s number in the list, add the –index <NUMBER> everytime you invoke springcoreconfig.exe.
Write a complete configuration
From a configuration file
The configuration files for the SpringCore family are either
- Key/Value pairs files (.CFG extension)
- JSON files (.JSON extension).
The actual content of these files is out of scope of this article. The reference documentation is available online (direct links: CFG files, JSON files)
Always make sure that the configuration you intend to apply to your device is valid and compatible with this very device!
Important: WRITING AN INVALID CONFIGURATION, OR A CONFIGURATION DOES NOT TARGET THE RIGHT DEVICE, IS LIKELY TO MAKE THE DEVICE UNUSABLE. IN SOME SITUATION, RECOVERY IS NOT POSSIBLE (this is typically the case if all the communication interfaces are disable by the configuration, or if the configuration activates host authentication but the password or key is lost).
Use springcoreconfig.exe –file <CONFIGURATION FILE NAME> to write this new configuration into the device.
Specify –file-type=CFG or –file-type=JSON if the file name does not have an explicit extension.
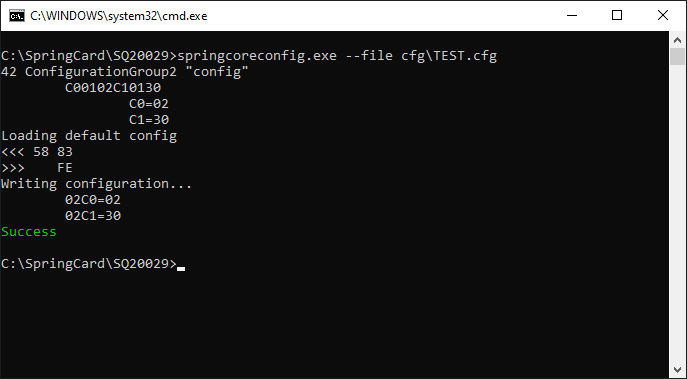
Note that writing a new configuration is actually done in two steps
- The device erases all its configuration registers and restores its out-of-factory configuration,
- The new configuration is written.
Thanks to this two-step process, the configuration file does not have to set all the registers to potentially erase earlier values. Only the relevant register have to be defined, any register that is not explicitly set in the configuration file is restored to its default value.
The device restarts immediately to activate the new configuration.
How to create and download a configuration file?
Using SpringCard Companion Web application (companion.springcard.com) is the recommended method for creating and editing configurations. The Web application could be used even if you don’t want to install the Companion Service, or if your operating system does not support the Companion Service.
After you’ve created your configuration in Companion, click the button Apply to device, and then click the button Download the configuration in JSON format.
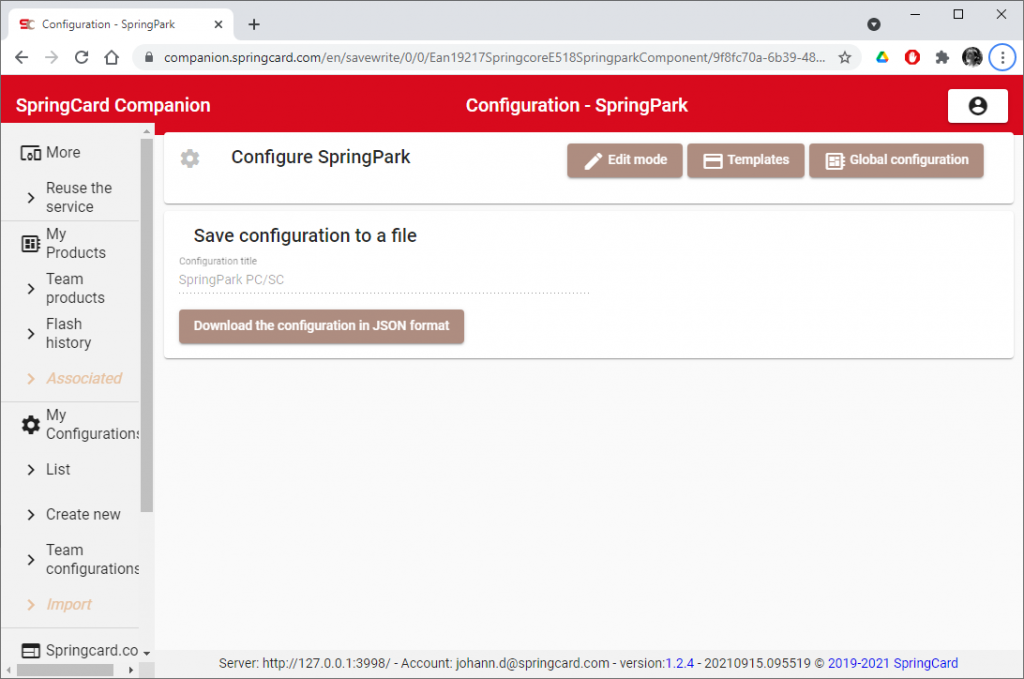
Use springcoreconfig.exe to write the downloaded JSON file into the target device.
From an URL
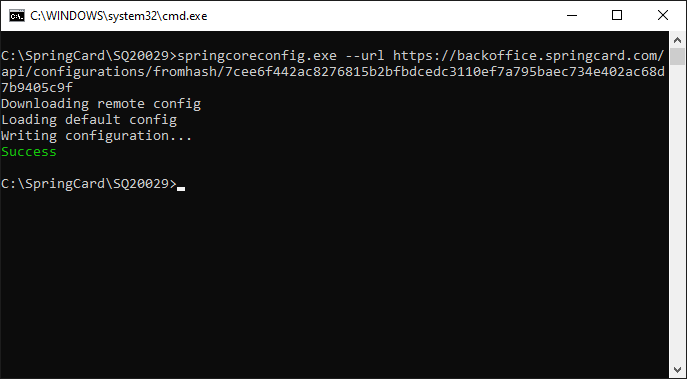
Alternatively, you may use springcoreconfig.exe –url <COMPLETE URL OF THE CONFIGURATION> to write a configuration directly from its web address.
Example with SpringCard Companion
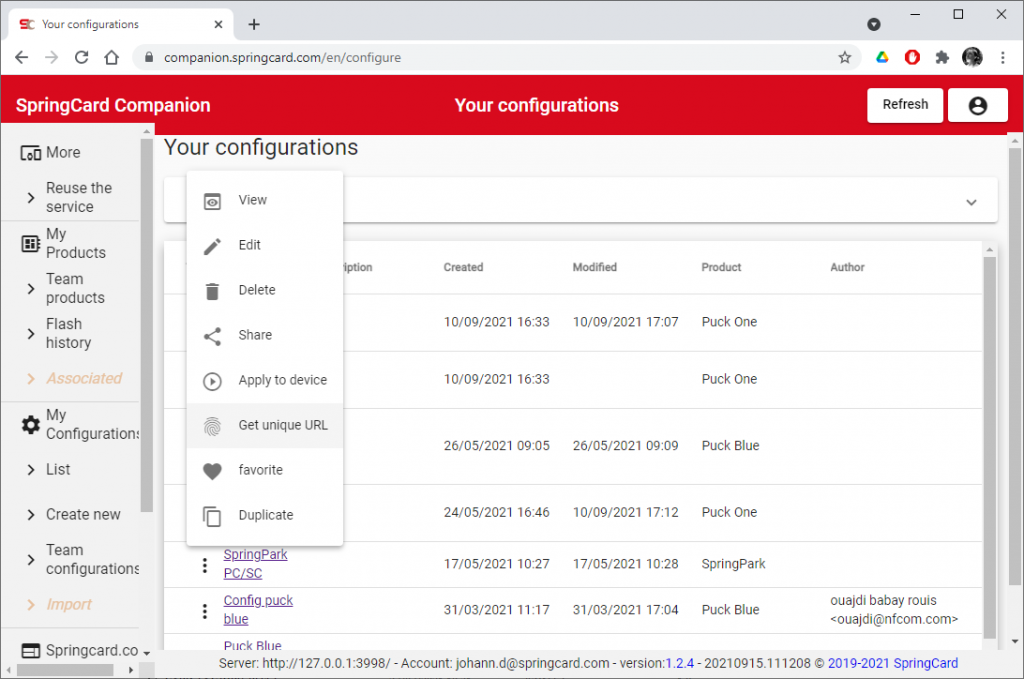
The SpringCard Companion Web application (companion.springcard.com) creates a unique, secure (unpredictable) URL for every configuration.
In the Web application, select the configuration you want and open its popup menu (3 vertical dots), then click Get unique URL.
The configuration’s URL is then copied into the clipboard.
Write springcoreconfig.exe –url on the command-line, and paste the URL (shortcut Ctrl+V).
Advanced operations
Read-back the configuration from the device
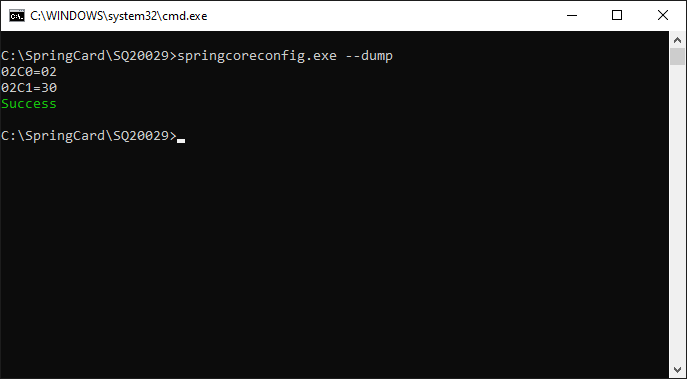
Use springcoreconfig.exe –dump=config to read the (explicitly set) configuration registers (page 2 in non-volatile memory).
springcoreconfig.exe –dump is a shortcut to do the same.
For a Smart Reader, springcoreconfig.exe –dump=template reads back the (explicitly set) template registers (page 3 in non-volatile memory).
springcoreconfig.exe –dump=constants reads the constants (page 1 in non-volatile memory).
Edit the configuration manually
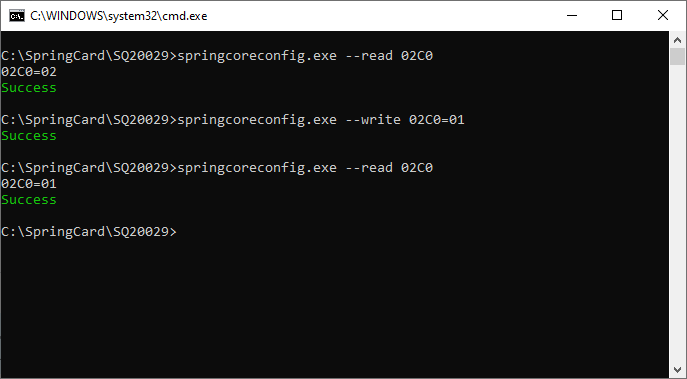
Use springcoreconfig.exe –read <ADDRESS> to read one register.
The ADDRESS parameter is a 2-byte address expressed in hexadecimal. Allowed adresses are 0200 to 03FF (see the documentation of the SpringCore NVM for details).
Use springcoreconfig.exe –write <ADDRESS>=<VALUE> to write one register.
The ADDRESS parameter is the same as for reading. The VALUE parameter is the value to set into the register, i.e. 1 to 32 bytes expressed in hexadecimal.
Use springcoreconfig.exe –write <ADDRESS>= (missing VALUE) to erase one register.
Important: WRITING AN INVALID VALUE IN A REGISTER, OR ERASING A KEY REGISTER IS LIKELY TO MAKE THE DEVICE UNUSABLE.
To apply the new configuration, reset the device manually or use springcoreconfig.exe –reset.
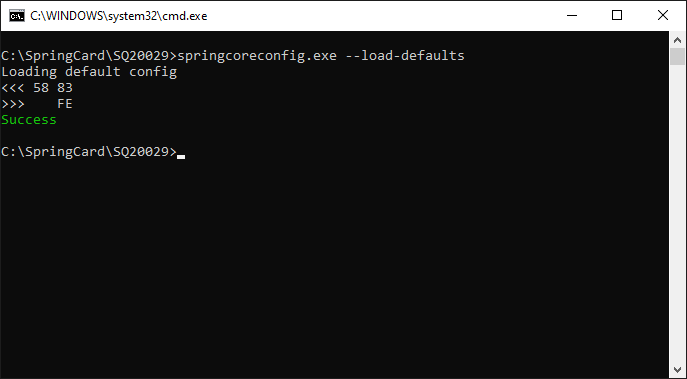
Restore the default configuration
Use springcoreconfig.exe –load-defaults to restore the device to its out-of-factory configuration.