Devices in the SpringCore family feature on or more Secure Elements (SE) to store the security keys that are involved in your system. This covers both the keys used by the Smart Reader template engine or a PC/SC application for authenticating and validating the user credentials (contactless card or NFC pass) and the keys used for securing the communication between the device and the back-end system (MQTT over TLS to interact with a cloud system, secure BLE, secure UDP or TCP protocols, etc.).
Both Puck and SpringPark feature a Microchip ATECC chip (formerly an Atmel reference) to store ECC private keys (NIST P-256 curve a.k.a. secp256r1 and prime256v1). Such private keys are typically involved in three use cases:
- To authenticate and decipher (decrypt) an Apple VAS NFC pass (Passkit),
- To activate, authenticate and decipher (decrypt) a Google VAS NFC pass (Smart Tap),
- To open a SSL/TLS secure communication channel with a server over a TCP/IP network, providing client-side authentication of the device.
This article shows how-to insert existing ECC private keys into the SpringCore’s ATECC.
Another article (coming soon) will show how-to generate new ECC private keys directly inside the device, generate a CSR and write an approved X509 certificate (CRT) into the device for advanced SSL/TLS operation.
ECC keys in a nutshell
Mathematical background
The article https://cryptobook.nakov.com/asymmetric-key-ciphers/elliptic-curve-cryptography-ecc is a good introduction to ECC. We summarizes here only the very essence.
An elliptic curve is a set of points (x; y) which satisfy the equation y2 = x3 + ax +b , where a and b are the curve’s parameters.
An interesting feature of such a curve is that any straight line that crosses the curve at least once, in fact it crosses the curve exactly three times.
An “add” operator is defined on this curve: the result of “adding” two points G1 and G2 on the curve is the third point P where the straight line that passes by G1 and G2 and crosses the curve again. “Adding” a point to itself (G + G) is also possible by considering the straight line that is tangential to the curve on this very point, and taking the (only) other crossing as the result (P). The “scalar multiplication” is then defined as k.G = G + G + … + G (repeated k times), and by construction the result P= k.G is again a point on the curve.
Since computers are not able to work with real numbers, x and y (and k as well) are restricted to a limited range of integers, typically the interval [ 0 .. 2256 ] i.e. 256-bit numbers. This means that additions and multiplications over x and y are reduced modulo 2256. The straight lines turn into a succession of segments, but the same principles still apply.
The magic behind elliptic curve cryptography is that given an initial point G on the curve and a scalar coefficient k, it is easy to determine the resulting point P = k.G, but this is not reciprocal: given two arbitrary point G and P it is “computationally impossible” to find k such as k.G = P.
In other words, if Alice pick-ups a (random) coefficient k, she could disclose the curve’s parameters (a and b) and the coordinates of points G and P while remaining the only one to know k.
Now suppose Alice and Bob agrees to use a particular curve and a common generator. Alice’s private key is kA and her public key is PA, Bob’s private key is kB and his public key is PB. Alice now wants to share some sensitive information with Bob secretly.
- For Alice, it is easy to compute SA = kA.PB
- For Bob, it is easy to compute SB = kB.PA
Now let’s develop the scalar products
- SA = kA.PB = kA . ( kB.G ) = (kA x kB) . G
- SB = kB.PA = kB . ( kA.G ) = (kA x kB) . G
Obviously, SA = SB ! Alice and Bob now share a common secret point S, that nobody else could guess. They may now use the coordinates of this secret point as an AES key (for instance) to secure their communication. This algorithm is called ECDH, the elliptic curve Diffie-Hellman key agreement, and this is the foundation of both Apple VAS (Passkit) and Google VAS (Smart Tap) security systems.
Private keys over P-256
In order to limit the complexity of the crypto-system, to be able to test it heavily and to optimize the software implementations, the curve’s parameters and the generator point are not taken arbitrarily. Researchers in applied cryptography have investigated and advice to use a few combinations.
The NIST P-256 curve+generator combination is one of the most frequent combinations found in secure software or in secure protocols today. The same combination is named secp256r1 in the specification of TLS (RFC8422) and prime256v1 in the OpenSSL software, and is the one used by both Apple and Google to secure their VAS systems.
The ATECC Secure Element of the SpringCore family provides an efficient implementation of P-256 in hardware. Since the curve’s parameters and the generator are fixed, the only information to be written into the device is the private coefficient k. This is a 256-bit “big integer”, i.e. a 32-byte binary value.
In all the software provided by SpringCard, and in all files manipulated by such software (which all are text files, either basic CFG files or more structured JSON files), the private key is specified as a 64-character hexadecimal string.
OpenSSL private key format
OpenSSL is the standard open-source solution for creating and manipulating private keys (and much more). OpenSSL stores its cryptographic material in .pem files.
NB: the screenshots below have been taken on a Windows system, but OpenSSL is also available on macOS and Linux, as well as on virtually any UNIX system.
Let’s see how-to extract the 32 bytes private coefficient from an OpenSSL private key file in PEM format.
- At first, we create a private key other the P-256 (prime256v1) curve.
openssl ecparam -name prime256v1 -genkey -out PRIVATE-KEY.pem
- Now we use the openssl ec -text command to dump the private key
openssl ec -in PRIVATE-KEY.pem -text
In the above output, we find:
- The private coefficient (priv), value E3ADA2147D89F430E5F0294FEB7484EB8BA21F9C7EA4078020FFE6BFB7E74D4D. As expected, this is a 32-byte number (64 hexadecimal characters)
- The public key (see paragraph “OpenSSL public key format” below),
- The name of the curve (ASN1 OID = prime256v1, NIST = P-256).
NB: Since the ATECC supports the P-256 curve only, you’ll never be able to use a key that has been created for a different curve with the SpringCore devices.
OpenSSL public key format
Manipulating public key is not required to write the private keys into the ATECC, but since the public key are important to make the Apple VAS (Passkit) and Google VAS (Smart Tap) systems running, it is interesting to explore the matter a little.
In the screenshot showing the dump of the private key in the last paragraph, the public key is displayed with value 043521…CB55C9.
Let’s see how-to understand this value.
- For security reason, it is better to work on the public key only every-time we don’t have to know the private key.
openssl ec -in PRIVATE-KEY.pem -pubout -out PUBLIC-KEY.pem
- Dumping the public key gives us the same value as earlier:
openssl ec -pubin -in PUBLIC-KEY.pem -text
The public key is a 65-byte value (130 hexadecimal characters) always starting with value 04. This constant header, together with the size, denotes that we have the two coordinates of the point that makes the public key.
In this example
- The x coordinate of the public key is 35213CFFF80E1DD5DF95D21F7656A8B37D2E5AAAF5C9AB81C7584AEBC050A3C8
- The y coordinate of the public key is 194A4ACD574381C558AB0781940660820A8D7ED40643F9F06D82DBA38CCB55C9
At this step, we could remember that the public key is a point on the curve. Therefore, providing x should be enough, since y could be computed easily from the equation of the curve — well, not exactly, since the equation is in the form y2 = x3 + ax +b , for every x, there are two different solutions, y and -y. Hence we have to provide both x and a way to identify the sign of y. This is called the compressed form of the public key.
The ——BEGIN PUBLIC KEY … END PUBLIC KEY—— group as the end of the output is the content of the .pem file itself:
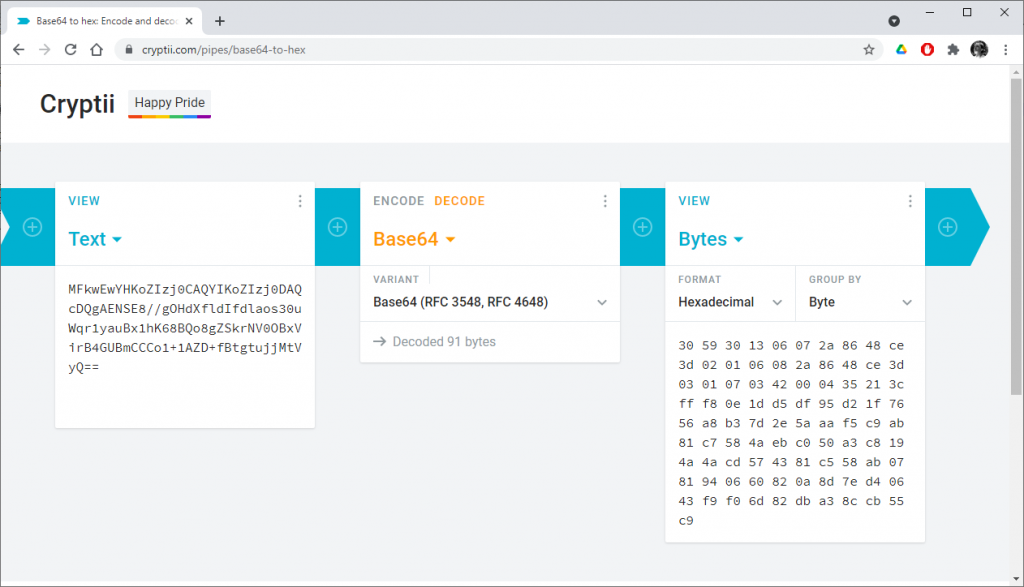
This is a base64 representation of the 2 coordinates:

Once translated into hexadecimal (and line breaks added at the right places), the value is
3059301306072A8648CE3D020106082A8648CE3D030107034200
04
35213CFFF80E1DD5DF95D21F7656A8B37D2E5AAAF5C9AB81C7584AEBC050A3C8
194A4ACD574381C558AB0781940660820A8D7ED40643F9F06D82DBA38CCB55C9
It is easy to recognize the 04 value followed by the x and y coordinates. The header 3059..4200 contains the details of the curve (ASN1 OID).
- Dumping the public key in ANSI X9.62 compressed form:
openssl ec -pubin -in PUBLIC-KEY.pem -text -conv_form compressed
The public key is now a 33-byte value (66 hexadecimal characters) and the first byte is either 02 or 03.
In this example
- The x coordinate of the public key is 35213CFFF80E1DD5DF95D21F7656A8B37D2E5AAAF5C9AB81C7584AEBC050A3C8
- The y coordinate of the public key is even (header is 03). This is enough to compute the right y knowing x (header 02 would have denoted an odd y).
Using your ECC public key with Google VAS (Smart Tap)
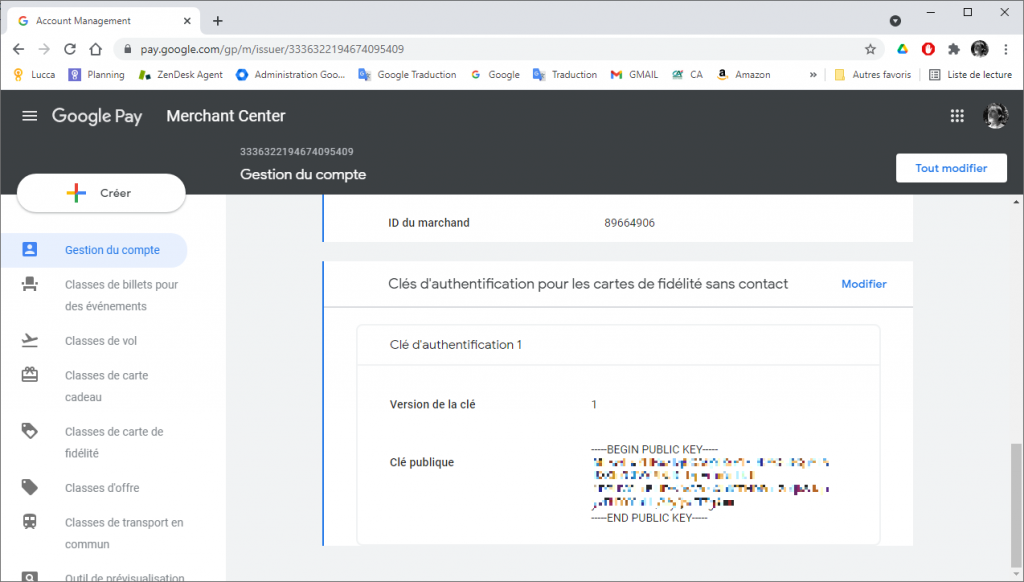
The public key of the Smart Tap scheme has to be provided to Google through the Merchant Center.
Use the content public key .pem file directly.
Using your ECC public key with Apple VAS (Passkit)
The public key of the Passkit scheme does not have to be provided to Apple directly, but is present inside all the NFC passes (.pkpass file), in the pass.json‘s encryptionPublicKey entry.
In this entry, the compressed key shall be entered in base64. This is the end of the output of the openssl ec -pubin -in PUBLIC-KEY.pem -text -conv_form compressed command-line.
When configuring your SpringCore device as an Apple VAS Smart Reader, you’ll have to provide the Key ID that is associated to your public/private keys couple.
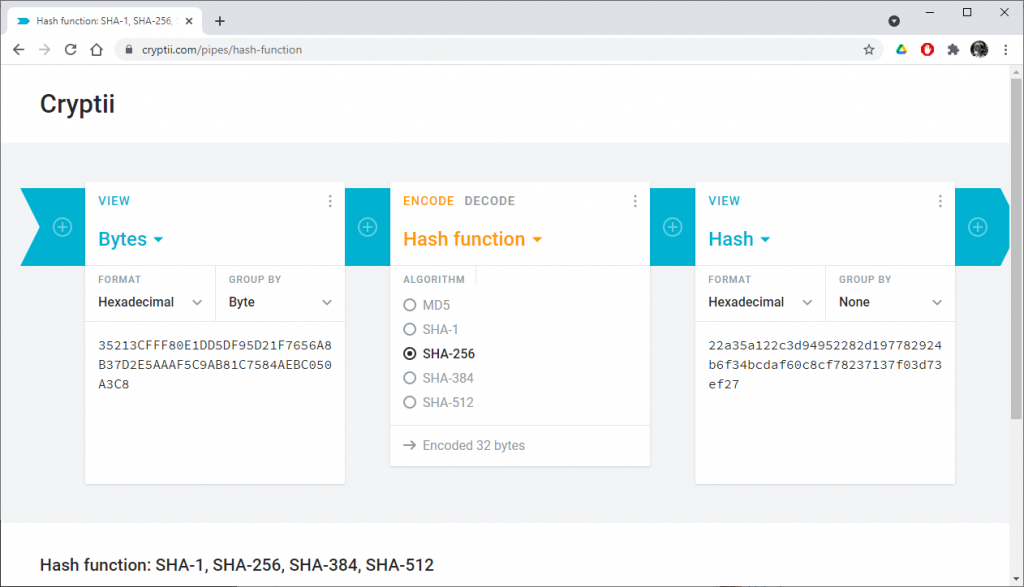
To get the Key ID, compute the SHA256 of the x coordinate of the public key and keeps the 4 first bytes:

In our example,
- x = 35213CFFF80E1DD5DF95D21F7656A8B37D2E5AAAF5C9AB81C7584AEBC050A3C8
- SHA256 (x) = 22A35A122C3D94952282D197782924B6F34BCDAF60C8CF78237137F03D73EF27
- Key ID = 22A35A12
ECC private keys in the SpringCore devices
Now that we are at ease with ECC keys, understanding the format of private keys used by the SpringCore devices is easy: a private key is nothing more than the 32-byte value of the coefficient (the P-256 curve and generator being a constat of the ATECC Secure Element).
The ATECC has 14 slots to store private keys, numbered 00 to 0D (the complete documentation is on docs.springcard.com).
Slots 0A, 0B, 0C and 0D are reserved for host-to-device secure communication (TLS etc). Therefore, only the slots 00 to 09 shall be assigned to a Smart Reader template or accessed by a PC/SC application.
In the rest of this article, we’ll use slot 05 for demonstration, but everything would work the same with a different slot (this is also true with more than one slot at once when configuration files are involved).
Using springcorese.exe to write ECC private keys
springcorese.exe, a software from the SpringCore Tools suite, is the command-line utility to manipulate the keys (and some settings) of the device’s Secure Elements.
To download and setup springcorese.exe and the related tools, please read Installing the SpringCore Tools.
NB: the screenshots below have been taken on a Windows system, but the software also runs on macOS and Linux (over the Mono runtime).
List the devices and select the target
If you have a single SpringCore device connected to your computer at a time, you may skip this paragraph.
springcorese.exe operates on one SpringCore device at once. Therefore, if two or more devices are connected simultaneously to the computer, the command-line must specify which one is the target device.
Enumerate the available devices
Use springcorese.exe –list to list the devices.
Identify the device you want to work with, and remember its number.
Tip: if you have many devices of the same type (say, two Puck One), use springcorese.exe –list-details to complete the list with the serial number, and use the device’s label to find the right one.
Select the target device
Knowing the device’s number in the list, add the –index <NUMBER> everytime you invoke springcorese.exe.
Inserting a private key in the ATECC
Use springcorese.exe atecc <SLOT NUMBER> setkey –raw-in <PRIVATE KEY VALUE> to insert a private key in the ATECC (note the slot number is in decimal, and the raw private key in hexadecimal).
Alternatively, you can write the key from the private .pem file.
To do so, use springcorese.exe atecc <SLOT NUMBER> setkey <PRIVATE KEY FILE>
Verifying the key that is in the ATECC
Obviously, it is never possible to read back a private key (otherwise, it would not remain private forever…). But we may ask the ATECC to compute the public key from the private key, and check whether it matches with the expected public key.
To do so, use springcorese.exe atecc <SLOT NUMBER> getpub –raw-out
The software returns both the x and the y coordinate of the public key point. You may verify that these values match the “pub” part of openssl ec -in PRIVATE-KEY.pem -text output.
Alternatively, you can extract the public key to a public .pem file.
To do so, use springcorese.exe atecc <SLOT NUMBER> getpub <PUBLIC KEY FILE>
Once again, this must match with the public key computed by OpenSSL.
Removing a key from the ATECC
Technically speaking, it is not possible to erase a key, but it is possible to overwrite the previous one with a dummy key.
Use springcorese.exe atecc <SLOT NUMBER> setkey –raw-in BLANK to do so. Reading back the public key shows that the earlier value of the slot has been forgotten.

For reference, the dummy key used by springcorese.exe when the BLANK keyword is used is not actually “blank” (this would not be a valid coefficient at the ATECC would reject it), but is one of the private keys coming from the NIST test vectors:
- k = 7A1A7E52797FC8CAAA435D2A4DACE39158504BF204FBE19F14DBB427FAEE50AE
- x = 2B42F576D07F4165FF65D1F3B1500F81E44C316F1F0B3EF57325B69ACA46104F
- y = 3CE76603264661EA2F602DF7B4510BBC9ED939233C553EA5F42FB3F1338174B5
Using springcoreconfig.exe to write ECC private keys
springcoreconfig.exe, a software from the SpringCore Tools suite, is the command-line utility to manipulate device configurations.
springcoreconfig.exe is not only able to write all the device’s configuration register (key features described in this article) but also to write private keys into its ATECC.
(coming soon)
A basic configuration file, containing only ECC keys
Configuration files for springcoreconfig.exe (and for springcoremastercard.exe) use either the CFG or the JSON format. Using JSON format is preferred for readability.
Let’s create a JSON configuration file and edit it to add two private keys:
- Private key specified on slot 05 is the same as in earlier examples,
- Private key specified on slot 06 is another key generate for demo purposes,
- The no-load-defaults = true statements in essential: if this statement were missing, springcoreconfig.exe would erase the device’s configuration (actually, it would revert the device to its default configuration) while writing the private keys.
A more complex configuration file, containing Apple VAS and Google VAS Smart Reader templates
In the future, the Smart Reader templates for Apple VAS and Google VAS will be added to SpringCard Companion, but as for today, such configuration must still be edited manually. Don’t panic! This is fully documented on docs.springcard.com (see Smart Reader Operation and Non-volatile memory / Templates). There’s also a ready-to-use sample on springpass.springcard.com (this service is available under NDA, contact us for details).
(coming soon)
Using a master card to write ECC private keys
springcoremastercard.exe, a software from the SpringCore Tools suite, is the command-line utility to create master cards (based on a NXP Desfire EV1 contactless chips) to convey complete configurations securely to the devices that are already in the field.
Master cards created using springcoremastercard.exe are not only able to write all the device’s configuration registers (key features described in this article) but also to write private keys into its ATECC. The format of the configuration files (JSON or CFG) is the same for springcoremastercard.exe as for springcoreconfig.exe. Therefore, we could directly use the configuration files created in the previous chapter.
Use springcoremastercard.exe –file <NAME OF CONFIGURATION FILE> –keyset <NAME OF KEYSET FILE>. Refer to the article about sprincoremaster.exe for details.

Apply the master card to the device to have the new keys (slots 05 and 06) written into the device’s ATECC.


