In 2016, SpringCard introduces a new family of network-attached NFC/RFID couplers, providing PC/SC functionnality on top of TCP/IP. The family is built from the SpringCard E663 module, the Ethernet-world counterpart of H663 (for USB world) and K663 (for serial world). The two first products of the family are the TwistyWriter-IP PC/SC, made for OEMs, and the FunkyGate-IP PC/SC, targetting access-control applications. The second one is also available as a FunkyGate-IP+POE PC/SC, where ‘POE’ stands for ‘power-over-Ethernet’, i.e. the device takes its power from the network cable.
To support all the devices based on the E663 module, SpringCard has developed from scratch a PC/SC driver for Windows. This page explains how-to install and use this driver, code-named ‘NetPCSC for Windows’. People who want to use the same devices in a Linux/Unix environment shall use the NetPCSC for PCSC-Lite driver.
Supported operating systems
The NetPCSC for Windows driver is available for
- x86 processor: Windows 10, Windows 8.1, Windows 8, Windows 7
- amd64 (x64) processor: Windows 10, Windows 8.1, Windows 8, Windows 7
It should run on server platforms as well.
Installation
Download and install SpringCard NetPCSC from http://www.springcard.com/en/download/find/file/sd15424
This installer registers the NetPCSC driver and installs the NetPCSC service, which acts as a bridge between the network-attached readers and Windows’ driver land. Add the end of the installation, the installer offers to open the NetPCSC configuration tool to configure your reader(s).
Configuration
Why not plug’n’play?
When you use the standard CCID driver with a plain-old USB-attached reader, there’s nothing to configure: attach the reader to the computer, the Windows looks for a suitable driver, and everything is ok.
But when we come to a network-attached reader, there’s no direct connection between the reader and the computer, so nobody could tell Windows that there’s something to do. More than that, if a computer automatically try to activate a driver for any NetPCSC reader it founds on the network, it means that if there are 2 computers (or more) on the network, they will fight to take control of the reader.
To keep things simple and reliable, the NetPCSC reader is a TCP server, and to be able to use it, the NetPCSC driver must be explicitely configured with the IP address of the reader. Make sure that you don’t configure the same reader on more than one computer.
Setting the reader’s IP address
Before introducing a new reader to NetPCSC configuration, you must use SpringCard NDDU (Network Device Discovery Utility) to set the IP address of your reader(s), or to retrive the actual IP address of the readers configured as DHCP client.
Latest version of NDDU is here: http://www.springcard.com/en/download/find/file/sn13210
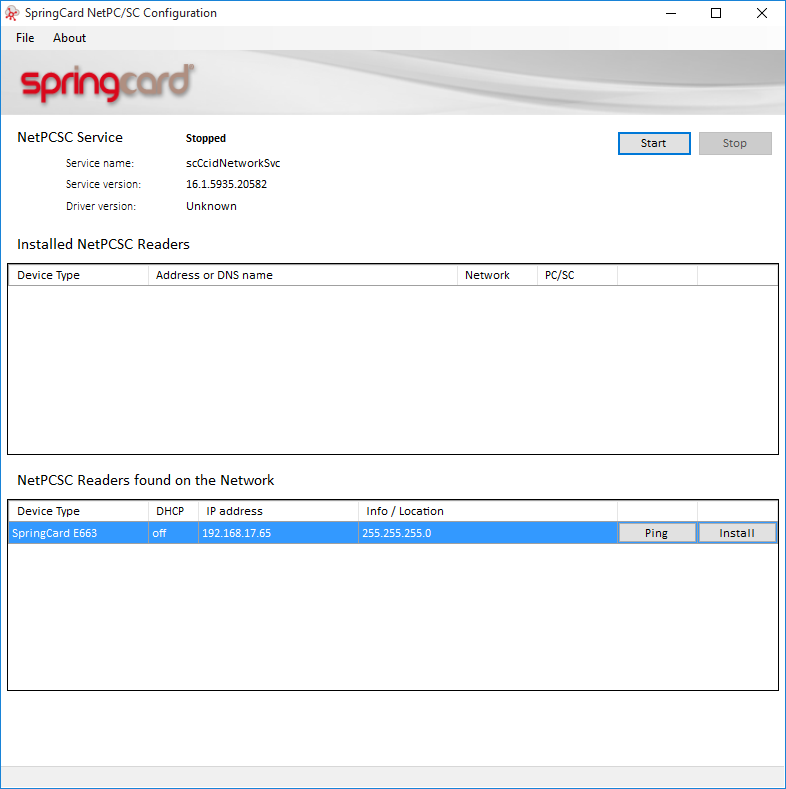
Using SpringCard NetPCSC Configuration tool
Launch the SpringCard NetPCSC Configuration tool from Windows’ start menu. (No start menu? Well stop using Windows 8.0!). When launching the tool for the first time, Windows Firewall prompts you to accept the use of UDP port 3999. Please click “accept” or the tool will be unable to locate the readers. If you’re using another firewall, you may have to set the rule explicitely.
In the application’s main window, the bottom box shows the reader(s) that are reachable on the LAN.
Technical note: the discovery process relies on UDP broadcast (from and to port 3999 as you may have guessed from the firewall rule). A query is sent by the computer every 3 seconds, and all the reader that ‘ears’ it answers within 1 second.
 Register a reader with NetPCSC
Using on the ‘Install’ button, you ask NetPCSC service to connect to a particular reader. An installed reader appears on the list on the top.
Once the NetPCSC service has managed to connect to the reader, the service instanciate the NetPCSC driver.
The first time a reader is installed, you’ll be prompted to approve the NetPCSC driver.
Using NetPCSC
Validate that the driver is running
Before going further, it is a good idea to verify that the reader appears in the list of connected PC/SC peripherals (SCardListReaders function).
Since there’s no standard tool on Windows to do so, we’ll use SpringCard PCSCDiag2 from the PC/SC Quickstart.
Please download and install SpringCard PC/SC Quickstart: http://www.springcard.com/en/download/find/file/sq13163
Launch PCSCDiag2 from the start menu, and check that a reader named ‘SpringCard E663 Contactless 0’ appears in the list. Put a contactless card in front of the reader, and see that the card’s ATR is displayed.
Developing with NetPCSC
Well, the magic behind PC/SC is that you don’t need to worry whether your reader is a NetPCSC or a more classical USB-attached device, on the developer’s point of view, it’s all the same. If you’re not familiar with PC/SC-development, please visit our page on the subject.
Troubleshooting
The NetPCSC service is not starting automatically
The service depends on Windows’ smart card service. Make sure this service is configured to start automatically.
PC/SC calls are stuck when the reader is disconnected from the network
Just wait. There’s a 2 minutes (120s) timeout in all queries. Next time, don’t disconnect the reader you’re working with.
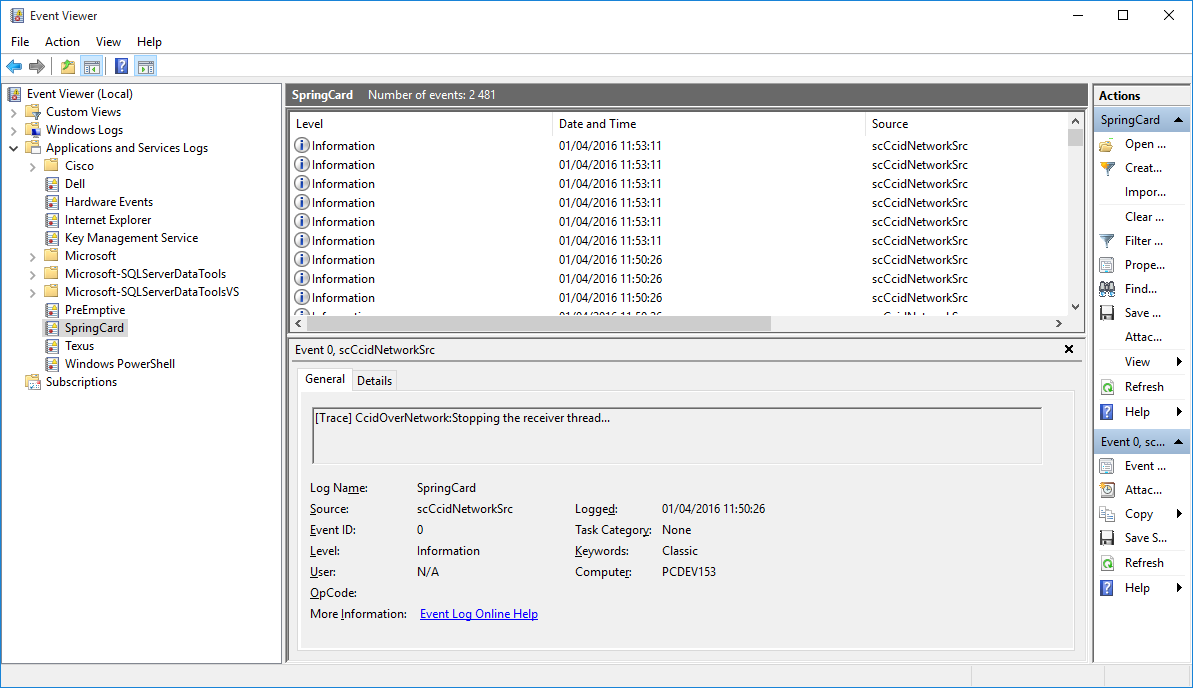
NetPCSC entries in event log
The service generates traces in case of issues. You can start the Windows event viewer. You have to select the SpringCard folder from ‘Applications and services logs’. You will then be able to watch traces generated by ScCcidNetworkSvc.
Enter Command : Start > Run > eventvwr.msc
Getting support
If you experience problems with NetPCSC driver and service, SpringCard support team will need a complete log to investigate the issue. This is done as follow:
- Open a console window (cmd.exe) with elevated rights (run as Administrator)
- Go to the service directory:
- CD “C:\Program Files (x86)\SpringCard\Driver\SD15424\x64” for an amd64 computer,
- CD “C:\Program Files (x86)\SpringCard\Driver\SD15424\x86” for a x64 computer,
- Stop the service by entering the command scCcidNetworkSvc stop
- Run the service with debug enabled, and redirect the output to a log file by entering the command scCcidNetworkSvc debug >> c:\temp\netpcsc.log
- Wait until the reader appears in PCSCDiag2, or at least 2 minutes (120 s) if it never appears
- Go back to the console window and press <ENTER> to terminate the running service
- Send the log file (c:\temp\netpscsc.log in this case) to SpringCard support team, together with an export of the event log as shown above.
Advanced use
Tweaking the configuration
The following information is for developers who want to optimize their application modifying the time-out value for the Write/Read sequence with NET reader.
The NET Write/Read exchanges with the SPRINGCARD reader depend on several time-out values. If you need to modify these values for your convenience, you can change them from the registry editor.

From cmd prompt, enter regedit.exe to start the application. You need to start it with the administrator rights. You have to go into the HKEY_LOCAL_MACHINE\SOFTWARE\SpringCard\CcidNetwork\Devices\XXX.XXX.XXX.XXX key (see below).
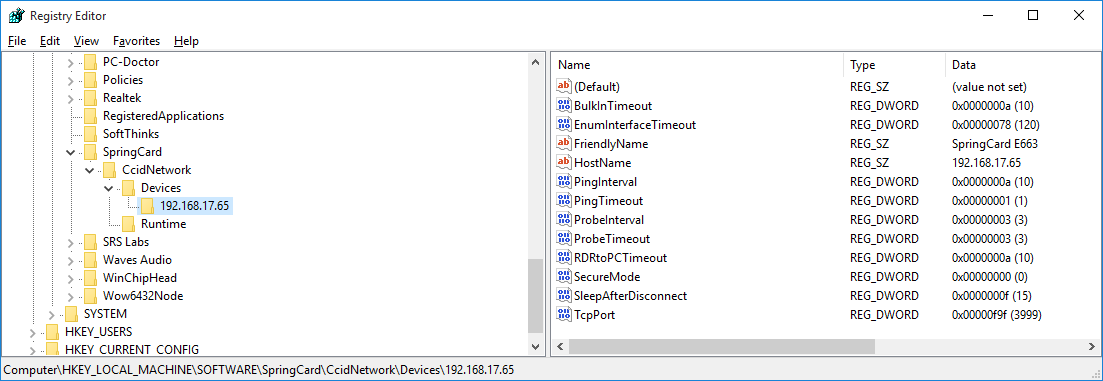
- BulkInTimeout: Reserved for future use.
- EnumInterfaceTimeout: Time-out to wait service/driver connexion.
- FriendlyName: Reserved for future use.
- HostName: IP address (do not change it).
- PingInterval: Time between each Ping test message.
- PingTimeout: Time-out to wait the answer from the reader after a ping test.
- ProbeInterval: Time between Probe message (get state of the reader).
- ProbeTimeout: Time-out to wait the answer from the reader after getting a state message.
- RDRtoPCTimeout: Time-out to wait the answer from the reader after writing a request.
- SecureMode: Reserved for future use.
- SleepAfterDisconnect: Time to wait before pinging again the reader after a removal.
- TcpPort: IP port (do not change it).
Service commands
From the command prompt, you can interact with the service.
- scCcidNetworkSvc install to install the service
- scCcidNetworkSvc uninstall to remove the service
- scCcidNetworkSvc start to start the service
- scCcidNetworkSvc stop to stop the service
- scCcidNetworkSvc debug to start the service in debug mode (interactive, <ENTER> to exit).