What is still possible: the Classical Access Control Architecture
SpringCard FunkyGate-IP/RDR is a network-attached wall smart reader, targetting physical Access Control and adopted by modern office buildings, airports, sensitive areas. The FunkyGate-IP+POE/RDR is the powered-by-the-network version. In a classical Access Control Architecture, the FunkyGate-IP/RDR acts as a TCP/IP server, and the Door Controller or the Access Control Central Computer connects to every reader as a client. The communication uses a custom client/server protocol, designed for reliability, security and speed.
As the reader runs as a TCP server induces a constraint on the network configuration, the reader’s IP address must be a routable address. The controller (or central computer) must be able to reach each reader directly, without crossing a NAT or a tunnel that rewrites the addresses. This is perfectly OK in a corporate LAN or WAN, and works even very well through a VPN, but remains unsuitable for some situations where the readers and the controller are ‘separated’ by the public Internet.
What is new: the HttpClient operating mode
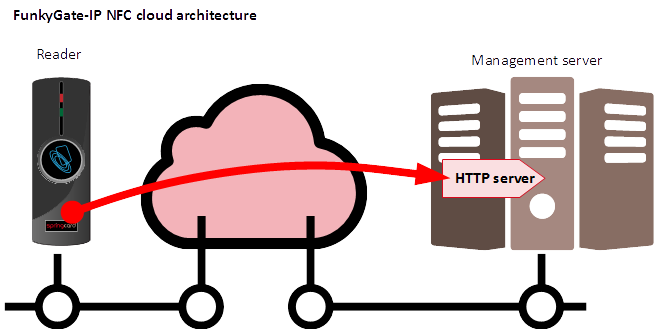
That is why, to address the emerging business cases of ‘cloud-centric’ identification solutions, SpringCard has added in FunkyGate-IP firmware the HttpClient operating mode.
This innovative feature makes it possible for the reader to reach a remote server, whatever is the network architecture between them, provided that the gateways are able to forward HTTP queries and responses. This also allows to interface the reader with any web-based application by the mean of a single API entry point using the HTTP POST verb. Security remains at a strong level; spoofing and replay attacks are thwarted by a simple yet efficient HMAC signature added to every message.
The HttpClient mode is available in SpringCard FunkyGate-IP starting with firmware version 1.70. If you have an early version, please upgrade your reader to the latest E663/RDR firmware according to this procedure.
Some more details
To give a quick try to the HttpClient mode with our public server in the cloud, proceed as follow :
- configure your reader as a DHCP client, and plug it on a network where the DHCP server provides within the lease parameters both the address of the gateway going to the Internet, and the address of a valid DNS server
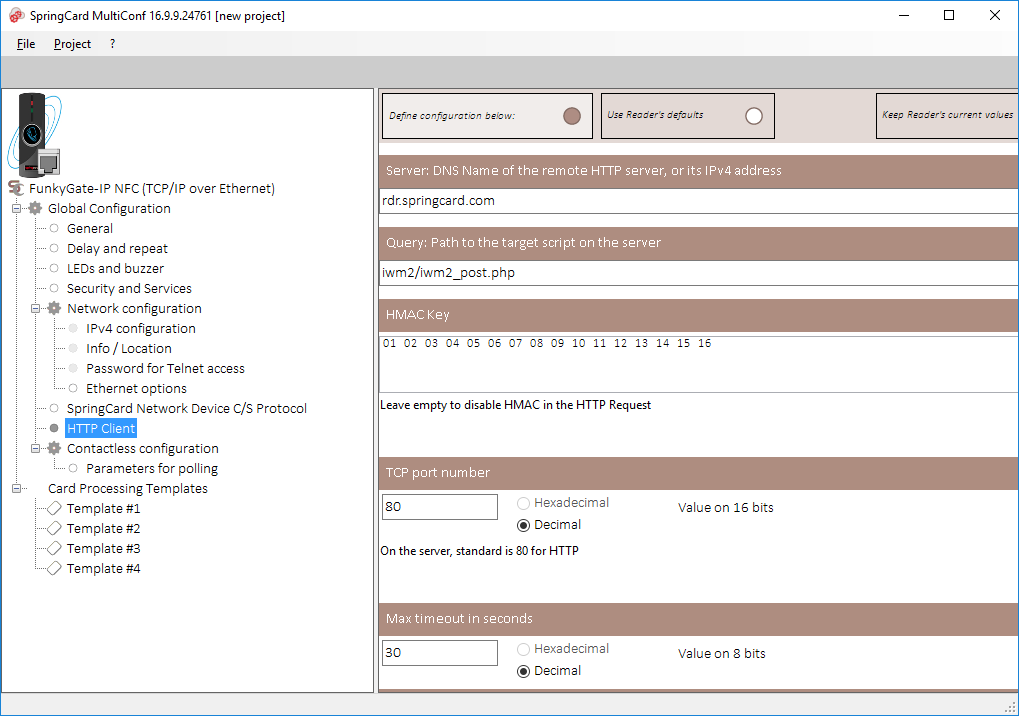
- configure your reader to operate in HttpClient mode, with the following options :
Name of remote server = rdr.springcard.com
Path to API entry point = iwm2/iwm2_post.php
Security key = 01020304050607080910111213141516
You’ll be using MultiConf software to do so.
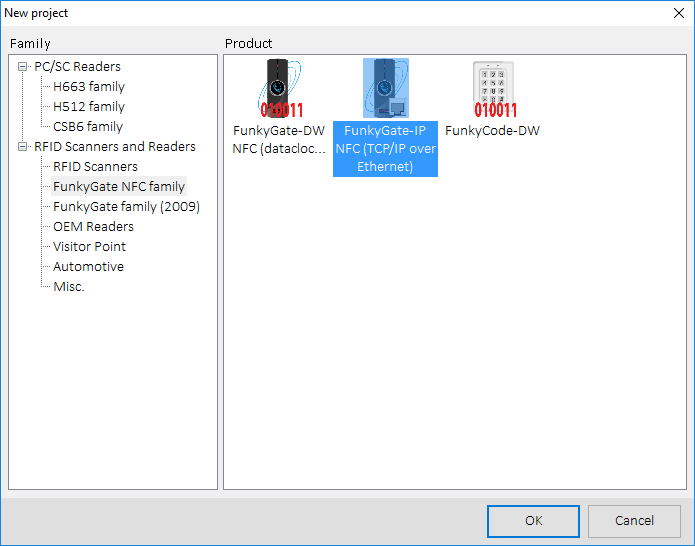
The following MultiConf project files provides the configuration you’ll need to configure the FunkyGate-IP/RDR as an HttpClient to our sample web server application:
- Project 1 preserves reader’s existing network configuration: [funkygate-ip-http-client-demo-keep-net-config] (zipped .multiconf file)
- Project 2 overwrites the network configuration to configure the reader as a DHCP client: [funkygate-ip-http-client-demo-set-net-config-dhcp] (zipped .multiconf file)
All other settings are preserved.
Hint: setting an explicit value into the Info/Location field could be useful to recognize your reader!
The configuration could be applied to the reader either by the mean of a Master Card (a Desfire card encoded by MultiConf using a Prox’N’Roll PC/SC coupler) or through the network. Use Network Devices Discovery Utilities (NDDU) to know what is the current IP address of your reader(s).
Once your reader is correctly configured -and connected to a network that is actually connected to the Internet through its default gateway-, open a web browser and go to http://rdr.springcard.com/iwm2/ and voila ! Everytime a card or tag is presented to the reader, its ID appears on the page. After 60 seconds of inactivity, the reader sends a keep-alive frame.
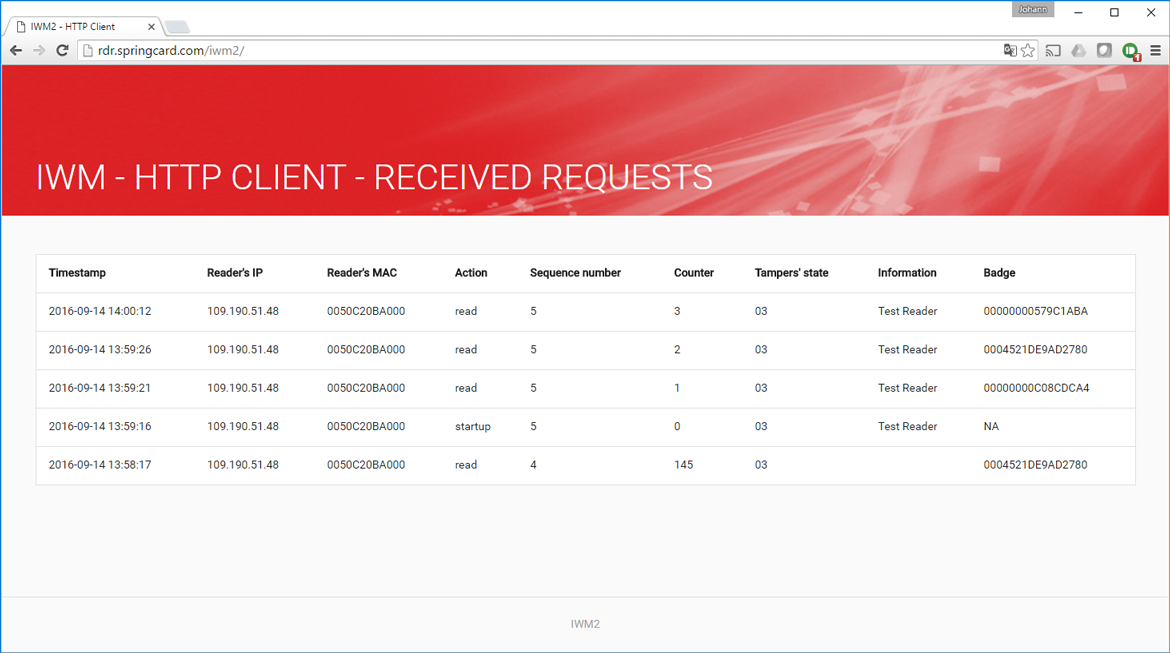
The sample application shows all the interesting data that come from the reader (the HMAC signature is checked but not displayed):
- The Reader’s MAC address, which is also its unique serial number, assigned in factory by SpringCard,
- The reason of the incoming message (Action field) which could be either startup (the reader has resetted), read (together with a Badge ID), tamper (everytime the state of a tamper has changed) or a periodic keepalive,
- The Information field comes from the Info/Location that could be freely defined to recognize your reader (apart from looking for its MAC address),
- The Tampers’ state field changes when the reader’s shell is open or the wall-mount magnet is lost,
- The Sequence number and Counter fields are needed to outflank replay attacks: the sequence is incremented everytime the reader reboots, and the counter after every message. The host application may then discard easily any outdated message that may be injected by an attacker. Also it could tell whether some messages have been missed (and blame the network!).
The Timestamp field doesn’t come from the reader but is added by the server itself. Also the Reader’s IP is not the actual reader’s local IP address, but the public address of the NAT gateway between the reader and the public Internet.
If you want to develop your own HTTP server to connect the reader to your applications, refer to the FunkyGate-IP/RDR Integration and Configuration Guide (chapter HttpClient).
Any server-side langage such as Node.JS, Ruby, Java (JSP), C# or VB.NET (ASP). At SpringCard’s we’re more familiar with PHP, so our demo web application is written in PHP. We’re using REDIS, a lightweight, memory only, NoSQL database, to forward the frames from the receiver script to the display script. You may download all the PHP files here: [funkygate-ip-http-client-demo-web-application-php] (.zip archive – works on Apache + PHP7, REDIS required, see readme.txt for details).
Note that our demo server sends a “beep” command to the reader following every “read” action. This means that once the reader is correctly configured and actually able to communicate to the server through the Internet, everytime you present a tag on the reader, you’ll hear two beeps (unless the beeps are disabled by a specific configuration):
- 1st beep is generated by reader’s internal logic to tell the user that the card has been read,
- 2nd beep comes from a command buzz=xxx provided in the server’s response.
The HttpClient also supports LEDs commands (see documentation for details).